

The Fresh Inspired Way to Cater Your Special Day. We hope you visit often to discover the latest and greatest trends in food, service and presentation. Bailey Connor Catering has catered events for over 18 years specializing in local and global mouthwatering cuisine. With a European flair of service Bailey Connor Catering is your choice for all things Bon Appétit!
Friday, August 1, 2014
Grilled French Toast Kebabs
Put
your grill to use to make these inspired breakfast kebabs, strung with
cinnamon-flavored bread and served with smoky bacon. This is delicious and different.


Monday, July 28, 2014
The Most Interesting Man In The World And Hot At 75

With understated masculinity and a lilting baritone modeled after his close friend and sailing partner Fernando Lamas, the ads show Goldsmith doing everything from ice fishing to sword fighting, with voiceover narration that would put Chuck Norris to shame ("the last time he flirted with danger, danger got clingy"). - See more at: http://drinkwire.liquor.com/post/the-man-behind-the-most-interesting-man-in-the-world?utm_source=zergnet.com&utm_medium=referral&utm_campaign=zergnet_170564#sthash.cWK3Pjbv.dpuf.. I agree he is hot. On loan from the Parade Magazine
Sunday, July 27, 2014
Watermelon Margarita Ice Pops perfect for any time to cool off

- cups
chopped seedless watermelon (1 1/4 pounds)
- 2 tablespoons fresh lime juice
- 3 tablespoons superfine granulated sugar
- 1/4 cup water
- 1/4 cup silver tequila
- Equipment: 8 (1/3-cup) ice pop molds and 8 wooden sticks
- Preparation: Purée all ingredients in a blender until smooth, then strain through a fine-mesh sieve into a large measuring cup, pressing on and then discarding solids. Skim off any foam, then pour into molds. Freeze 30 minutes. Insert sticks, then freeze until firm, about 24 hours.
- From Parade Magazine
Saturday, July 26, 2014
Celebrate the day with a Matcha Green Tea Latte

Matcha is the powdered leaves of green tea. It will give you a kick of energy—minus the overload on caffeine. With more antioxidants than regular green tea, this latte helps improve immunity function and reduce inflammation. Servings: 1.
1 c unsweetened vanilla almond milk
½ tsp matcha powder
2. PLACE matcha powder in a mug; pour about ¼ cup almond milk into the mug.
3. WHISK vigorously until frothy; add in remainder of almond milk.
10 Green Detox Drinks You Have To Try
1. HEAT almond milk in a sauce pan to 165° (just under boiling).
NUTRITION (per serving): 45 cal, 1 g pro, 3 g carb, 1 g fiber, 1 g sugars, 3 g fat, 0 g sat fat, 180 mg sodium
Saturday, June 28, 2014
Four Rules of Cast Iron Cooking
The more you cook, the more you realize that the best kitchen tools are often the simplest. One sharp chef’s knife is far more valuable than a 62-piece knife set. One big stainless-steel bowl will do more for you than the latest plastic contraption. And one heavy-duty cast-iron skillet will guide you to more delicious meals than any “revolutionary” cooking device sold via infomercial.
To that last point, allow David Guas to elaborate. See, Guas is a New Orleans guy who opened Bayou Bakery Coffee, Bar & Eatery in Arlington, VA. When he made the move up the East Coast, he brought little with him beyond his stock of recipes and his cast-iron skillet. “Beyond a chef’s knife, there’s no other tool in the kitchen that I can depend on to create incredible meal after incredible meal,” Guas says. He turns to cast-iron in his kitchen to sear fish to crispy perfection. He’ll use it to cook you the most delicious chicken you’ve ever tasted. He even uses his skillet to bake a mean pie.
But what the skillet gives you, you need to give back to the skillet. “With the right care, your cast-iron skillet should last you a lifetime—or a few,” Guas says, mentioning his Aunt Boo, who has been cooking with her skillets for 30-plus years and would frequently spot-check Guas’ upon visits to his home. Sure enough, Guas still uses the same skillet he brought with him to Arlington. Here’s how to give your skillet some love.
Unlike most pots and pans, skillets can’t handle the astringent properties of dishwasher soap or, worse yet, the abrasive texture of steel wool. That’s because cast-iron skillets are naturally “seasoned” with a light coating of oil that you apply after each use, says Guas. “The fat settles into the tiny holes of the cast-iron, creating a natural seal,” he says. Scrub away the seal and your food won’t sear as well. And your skillet will be more likely to rust.
Rule #1: Don’t wash it!
Rule #2: Do deep clean.
So what happens when caked-on crud accumulates on your skillet? First, pour a cup of water into the skillet over high heat. Boiling the gunk will help release it from the surface of the pan. Still stuck? Pour some Kosher salt in the skillet and use a few paper towels to rub the salt around, breaking up the build-up. Just remember to re-seal the skillet with a light coating of oil before storing, says Guas.
Rule #3: Store smart.
Small chips or dings in the surface of your skillet can affect how well your food sears, Guas says. So avoid storing your skillet upright in your usual pots-and-pans cabinet, where it’s more likely to pick up imperfections from its storage mates. You can nest the skillet inside other pans, but just make sure to put a layer of paper towels over the surface of the skillet for protection, Guas says. Or, just place your skillet on the stove top. It looks bad ass, so why not show it off?
Rule #4: Go easy on the metal.
Whether you're sautéing hash browns or flipping bacon, be careful with any metal utensil coming into contact with your skillet lest you risk damage. Better yet: Use a wooden spoon to do your stirring. Wood is always best!
To that last point, allow David Guas to elaborate. See, Guas is a New Orleans guy who opened Bayou Bakery Coffee, Bar & Eatery in Arlington, VA. When he made the move up the East Coast, he brought little with him beyond his stock of recipes and his cast-iron skillet. “Beyond a chef’s knife, there’s no other tool in the kitchen that I can depend on to create incredible meal after incredible meal,” Guas says. He turns to cast-iron in his kitchen to sear fish to crispy perfection. He’ll use it to cook you the most delicious chicken you’ve ever tasted. He even uses his skillet to bake a mean pie.
But what the skillet gives you, you need to give back to the skillet. “With the right care, your cast-iron skillet should last you a lifetime—or a few,” Guas says, mentioning his Aunt Boo, who has been cooking with her skillets for 30-plus years and would frequently spot-check Guas’ upon visits to his home. Sure enough, Guas still uses the same skillet he brought with him to Arlington. Here’s how to give your skillet some love.
Unlike most pots and pans, skillets can’t handle the astringent properties of dishwasher soap or, worse yet, the abrasive texture of steel wool. That’s because cast-iron skillets are naturally “seasoned” with a light coating of oil that you apply after each use, says Guas. “The fat settles into the tiny holes of the cast-iron, creating a natural seal,” he says. Scrub away the seal and your food won’t sear as well. And your skillet will be more likely to rust.
Rule #1: Don’t wash it!
Upgrade your cooking skills, impress your date, and reinvent your diet with 150+ easy, chef-approved recipes and tons of useful kitchen tips in Guy Gourmet cookbook
Rule #2: Do deep clean.
So what happens when caked-on crud accumulates on your skillet? First, pour a cup of water into the skillet over high heat. Boiling the gunk will help release it from the surface of the pan. Still stuck? Pour some Kosher salt in the skillet and use a few paper towels to rub the salt around, breaking up the build-up. Just remember to re-seal the skillet with a light coating of oil before storing, says Guas.
Rule #3: Store smart.
Small chips or dings in the surface of your skillet can affect how well your food sears, Guas says. So avoid storing your skillet upright in your usual pots-and-pans cabinet, where it’s more likely to pick up imperfections from its storage mates. You can nest the skillet inside other pans, but just make sure to put a layer of paper towels over the surface of the skillet for protection, Guas says. Or, just place your skillet on the stove top. It looks bad ass, so why not show it off?
Rule #4: Go easy on the metal.
Whether you're sautéing hash browns or flipping bacon, be careful with any metal utensil coming into contact with your skillet lest you risk damage. Better yet: Use a wooden spoon to do your stirring. Wood is always best!
Friday, June 20, 2014
Blueberry Walnut Salad
One of
my favorite salads. Easy and delicious, and perfect for any season, with berries,
nuts, and greens. For an entree add chicken, diced apples, and diced green
onions! For the fourth of July add Strawberries.
(10 ounce) package mixed salad greens
1 pint fresh blueberries
1/4 cup walnuts
1/2 cup raspberry vinaigrette salad
dressing
1/4
cup crumbled feta cheese
In a
large bowl, toss the salad greens with the blueberries, walnuts, and raspberry
vinaigrette. Top with feta cheese to serve.

Friday, May 16, 2014

Homemade Lemonade
From the Pioneer Woman blog, one of my favorites:
Ingredients
- 4 cups Sugar
- 6 cups Water
- 24 whole Lemons, Juiced
- 8 cups Water (additional)
- Lots Of Ice!
Preparation Instructions
Heat 4 cups sugar with 6 cups of water in a medium saucepan until it's dissolved. Set this in the fridge to cool.
Chill the lemon juice if you have the time.
Pour the lemon juice into a large vat. Pour in 3/4 of the syrup, then top off the vat with ice. Pour in 8 cups of water (give or take), stir it around, then give it a taste. Add more syrup if it needs sweetness, or more water if it needs dilution.
Serve immediately!
Add 2 cups raspberries, blueberries, blackberries, or sliced strawberries to the lemonade for different flavors.
Make hard lemonade by adding 2 cups light rum or tequila to the lemonade. (Naughty! Adults only!)
Chill the lemon juice if you have the time.
Pour the lemon juice into a large vat. Pour in 3/4 of the syrup, then top off the vat with ice. Pour in 8 cups of water (give or take), stir it around, then give it a taste. Add more syrup if it needs sweetness, or more water if it needs dilution.
Serve immediately!
Add 2 cups raspberries, blueberries, blackberries, or sliced strawberries to the lemonade for different flavors.
Make hard lemonade by adding 2 cups light rum or tequila to the lemonade. (Naughty! Adults only!)
Friday, April 11, 2014
Happy Easter and Fun with Spring Cleaning

Clean Sweep
- Throw open your cabinets and pull everything out—all the spice jars, all the half-empty sacks of flour, all the old cans of beans: everything. Small packages and little bottles of spices always end up getting pushed to the back of the cabinet or tucked behind a box of crackers. You won’t be able to see what you’re working with until it is all out in front of you; you might even find a few forgotten gems. When everything is pulled out, take a second to wipe down the shelves and replace any torn or stained shelf liners.
- Purging your cabinets of unused or unnecessary foods can be a tough activity for some people. Steel your nerves and remind yourself you deserve new, fresh kitchen staples.
- Start by tossing all the accumulated half-empty boxes of sugar and bags of flour. Declutter! Declutter!
- Toss or combine any duplicate spices. One home does not need four 2/3rds-full jars of celery salt.
- If you know you’re not going to use it and it’s unopened and unspoiled, consider donating it to a local food pantry or non-profit. If it’s opened, toss it.
- If you’re feeling like you’re in need of a fresh start, toss the high sugar cereal, sodas and snack cookies too!
- Standard flour bags and sugar boxes are just terrible. They let in moisture, tear easily and they keep you from seeing how much product is left inside. Invest in a set of resealable, airtight jars to store your pasta, flour, sugar and salt and other dry goods.
- Switching from the manufacture’s packaging to resealable jars may also encourage you to shop in bulk, saving you money and trips to the grocery store.
- Now that your pantry has been stripped to its bare essentials, it is time to restock the essentials and fill in the holes with a healthy and indispensable products.
- A well-rounded pantry provides the structure for a range of meals. Make a list of your 10 favorite weeknight dinners. Strip those recipes down to their non-perishable ingredients and—if space allows—make sure your pantry has everything it needs to handle cooking each recipe once.
- As you put everything back in your fridge take some time to consider when and how you’ll be using everything. Seasonal products (like holiday cookie cutters or pumpkin pie spices) don’t need to be stored in the prime real estate.
- Reserve the front and center shelves for healthy snacks and ingredients. You’re more likely to eat it if you see it!
For more tips on keeping a clean and healthy pantry check out Kelsey Nixon’s Kitchen Confidence and the upcoming Perfect Pantry from Geoffrey Zakarian.
Saturday, April 5, 2014
Chocolate Waffles by Ghirardelli

Ingredients
- 1 1/2 cup(s) Semi-Sweet Chocolate Chips
- 1 cup(s) Unsweetened Cocoa
- 2 cup(s) all-purpose flour
- 1 tablespoon(s) baking powder
- 2 tablespoon(s) granulated white sugar
- 1/2 teaspoon(s) salt
- 4 large eggs, separated
- 4 tablespoon(s) canola oil
- 2 cup(s) whole milk
1 1/2 cups Ghirardelli Semi-Sweet Chocolate Baking Chips
1 cup Ghirardelli Unsweetened Cocoa
2 cups all-purpose flour
1 tablespoon baking powder
2 tablespoons granulated white sugar
1/2 teaspoon salt
4 large eggs, separated
4 tablespoons canola oil
2 cups whole milk
1 cup Ghirardelli Unsweetened Cocoa
2 cups all-purpose flour
1 tablespoon baking powder
2 tablespoons granulated white sugar
1/2 teaspoon salt
4 large eggs, separated
4 tablespoons canola oil
2 cups whole milk
Read more at http://ghirardelli.com/recipes-tips/recipes/chocolate-waffles#UpYI6K4XF4uSK4Yr.99
INGREDIENTS
1 1/2 cups Ghirardelli Semi-Sweet Chocolate Baking Chips
1 cup Ghirardelli Unsweetened Cocoa
2 cups all-purpose flour
1 tablespoon baking powder
2 tablespoons granulated white sugar
1/2 teaspoon salt
4 large eggs, separated
4 tablespoons canola oil
2 cups whole milk
1 cup Ghirardelli Unsweetened Cocoa
2 cups all-purpose flour
1 tablespoon baking powder
2 tablespoons granulated white sugar
1/2 teaspoon salt
4 large eggs, separated
4 tablespoons canola oil
2 cups whole milk
Read more at http://ghirardelli.com/recipes-tips/recipes/chocolate-waffles#UpYI6K4XF4uSK4Yr.99
Saturday, March 29, 2014
Chef Inspired Untraditional Baked Ham
Ingredients
1 cup plum preserves
1/2 cup orange juice
2 tablespoons lime juice
1 tablespoon yellow mustard
1 tablespoon honey
2 teaspoons minced fresh ginger
1/2 teaspoon dried crushed red pepper
1 (7-lb.) smoked fully cooked, bone-in
ham
Garnishes: pineapple, kiwifruit, green
onions, black sesame seeds
Preparation
Stir together first 7 ingredients in a saucepan over medium-high heat; bring to a boil, stirring constantly. Reduce heat to medium-low; simmer, stirring constantly, 5 minutes or until preserves are melted and mixture is blended. Pour half of plum preserve mixture into a microwave-safe bowl.
Stir together first 7 ingredients in a saucepan over medium-high heat; bring to a boil, stirring constantly. Reduce heat to medium-low; simmer, stirring constantly, 5 minutes or until preserves are melted and mixture is blended. Pour half of plum preserve mixture into a microwave-safe bowl.
Trim excess fat on ham to 1/8-inch thickness. If desired, make long, shallow
cuts (about 1/16-inch deep) over entire ham, forming diamond patterns. Place
ham on a wire rack in an aluminum foil-lined roasting pan. Brush ham with a
portion of plum preserve mixture in saucepan.
Bake ham, uncovered, at 350° on lower
oven rack 1 hour and 30 minutes, basting with remaining plum preserve mixture
in saucepan every 30 minutes. Loosely cover with aluminum foil, and bake 1 hour
and 45 minutes or until a meat thermometer inserted into the thickest portion
registers 140°, basting every 30 minutes. Let ham stand 15 minutes before
slicing. Garnish, if desired.
Microwave plum preserve mixture in bowl
at HIGH 1 minute or until thoroughly heated. Serve ham with warm. mixture.
Bon Appetite
Friday, October 11, 2013
Chocolate Covered Bacon
Chocolate Covered Bacon
"This is the perfect marriage. The
sweetness of chocolate and the saltiness of bacon. What could be better?"
You will need:
12 slices thick-cut bacon
1 cup semisweet chocolate chips
1 tablespoon vegetable
shortening
Directions
1. Preheat
oven to 400 degrees F (200 degrees C). Place a baking rack on top of a large
baking sheet.
2. Thread
each slice of bacon onto a skewer; place skewered bacon on the baking rack.
3. Bake
bacon in the preheated oven until crisp; 20 to 25 minutes. Remove from oven and
cool completely.
4. Combine
chocolate chips and shortening in a microwave-safe bowl. Heat in the microwave
in 30 second intervals until chocolate is melted and smooth, stirring after
each interval.
5. Coat
each side of the skewered bacon with the chocolate mixture using a pastry
brush. Place coated bacon on a sheet of waxed paper. Refrigerate until firm, at
least 30 minutes. Store in refrigerator until ready to serve.
Note:
Optional toppings: candy sprinkles, finely chopped walnuts, pecans, pistachios, toasted coconut, brown sugar, cayenne pepper, or chopped dried apple chips. Sprinkle on topping of your choice while chocolate is still wet. From one of my favorite Allrecipes website which always inspires me.
Monday, September 23, 2013
Did you know...
Apples: Must be kept ice cold. Taking apples from cold storage to warm and back to cold will cause condensation, which will break down the wax on the surface, turning the wax into a whitish film.
By the way…Was the apple really the Forbidden Fruit in the Garden of Eden? Adam and Eve were naked, and apples ripen and color during cold Autumn nights. Some anthropologists believe it was actually the Mango. WOW
Thursday, September 12, 2013
Doggies Menu
I just read this in the Dining
Times. It is about time that American Restaurants are becoming more doggie
friendly and accommodating. Where I come from, you can bring your best friend
almost anywhere (Germany. Many
upscale restaurants are enticing customers by offering dog menus. Restaurants generally
take underutilized outdoor patio space where owners can dine with their dogs.
Some have separate menus with special entrees for dogs: anything from lamb stir
fry to meat loaf to scrambled eggs with bacon bits. When the pooch needs to
take a bathroom break, space is provided at the side or behind the restaurant, complete
with waste pickup bags. One Washington restaurant offers a “pooch patio menu”
with items like the bowser beer (a nonalcoholic beer) and a frozen raw bone sprinkled
with dill. The restaurant’s pastry chef bakes fresh dog biscuits as well. “It’s
not trying to profit off the pets. It’s to draw in the customers,” explained
one restaurant owner.
I think Bailey Connor needs to develop a doggie menu
and cookies.. Some of our happy brides and grooms bring their best friend to
the wedding.
Wednesday, May 16, 2012
Food for thought from the Chef

There are 360,000 more barrels of aging bourbon in the
state of Kentucky than there are residents. How crazy is that?
That’s over a quarter of a million more barrels of
bourbon than people. Where are they
housing all of that? Who is drinking all
of it? I just want to take a moment to
be proud that American Whiskey, or bourbon, is thriving because, without it,
these cookies wouldn’t be here. And I’m
not even sure bourbon is their star ingredient, because… it might be bacon, or
chocolate.
You don’t even need to choose which ingredient you think
is the star. Just make them. I’m loving the fact that some of the fat comes
from the bacon instead of butter and that they are chewy and soft and sweet and
salty and perfect. They’re the kind of
cookies that are going to get you winks at parties. The kind of cookies that get you noticed. They’re the kind of cookies that are going to
get you dates. They’re repeat business
cookies.
Bacon-Bourbon Chocolate Chip Cookies
5 tbsp bourbon or whiskey
3/4 pound bacon, diced
2-1/2 cups all purpose flour
1/4 tsp baking powder
1 tsp baking soda
1 tsp salt
3/4 cup unsalted butter, softened
1/4 cup bacon fat, chilled
3/4 cup granulated sugar
3/4 cup packed dark brown sugar
1 tsp vanilla extract
2 large eggs
8 oz. dark chocolate chips or chunks
Instructions
In a large pan, or in the oven under broil, cook bacon or
diced bacon pieces. Drain the pieces on a paper towel and reserve the fat,
draining it into a bowl to chill in the refrigerator until it has hardened to
the consistency of room temperature butter.
Preheat the oven to 375 degrees F. Combine the flour,
baking powder, baking soda, and salt in a small bowl and whisk together.
Beat the butter, bacon fat, sugars, bourbon, and vanilla
together in the bowl of a mixer until the sugar and butter are combined.
Add the eggs one at a time, beating well after each egg.
Beat in the flour mixture about one half cup at a time
Beat in the chocolate chips and bacon bits.
Bake at 375 for 9-12 minutes or until desired level of golden
brown. Let cool.
Tuesday, May 8, 2012
Thursday, May 3, 2012

Friday, April 13, 2012
Sun-Dried Tomato-Crusted Chicken
Sun-Dried Tomato-Crusted Chicken
Something easy for the weekend!

Ingredients/Bread Crumbs
4 cups panko bread crumbs
1 oz sun-dried tomatoes
2-3/8 tsp granulated garlic
5/8 tsp salt
1/3 tsp black pepper
Method/Bread Crumbs
Combine all ingredients in robot coupe until well blended and slightly red.
Store in airtight container. Use within 24 to 48 hours.
Ingredients/ Chicken
12 4-oz boneless, skinless raw chicken breasts
3 oz olive oil
1 Tbsp salt
1 Tbsp ground black pepper
Method/Chicken
Brush olive oil on chicken breasts, then sprinkle with salt and pepper. Dredge in bread crumbs and place on a sheet pan lined with parchment or pan spray. Hold in the refrigerator until time to cook.
Place chicken on a lightly oiled sheet pan and bake in a preheated 400º oven for 10–14 minutes until chicken reaches an internal temperature of 165º.
Suggestions
Serve with Garlic Cream Sauce, Steamed Haricot Verts, Spinach Mashed Potatoes
From Christine Scheil, Marquette University Catering, Milwaukee
Catersource magazine
November/December 2010
Ingredients/Bread Crumbs
4 cups panko bread crumbs
1 oz sun-dried tomatoes
2-3/8 tsp granulated garlic
5/8 tsp salt
1/3 tsp black pepper
Method/Bread Crumbs
Combine all ingredients in robot coupe until well blended and slightly red.
Store in airtight container. Use within 24 to 48 hours.
Ingredients/ Chicken
12 4-oz boneless, skinless raw chicken breasts
3 oz olive oil
1 Tbsp salt
1 Tbsp ground black pepper
Method/Chicken
Brush olive oil on chicken breasts, then sprinkle with salt and pepper. Dredge in bread crumbs and place on a sheet pan lined with parchment or pan spray. Hold in the refrigerator until time to cook.
Place chicken on a lightly oiled sheet pan and bake in a preheated 400º oven for 10–14 minutes until chicken reaches an internal temperature of 165º.
Suggestions
Serve with Garlic Cream Sauce, Steamed Haricot Verts, Spinach Mashed Potatoes
From Christine Scheil, Marquette University Catering, Milwaukee
Catersource magazine
November/December 2010
Friday, April 6, 2012
A little bit of Easter fun.
It’s a little known fact that Peeps grow on jelly bean trees. Topiaries, to be exact. It’s true. It must be. I have one in my kitchen right now. See? I can’t make these things up.

Thankfully, a Peep topiary makes a fabulous (and delicious) centerpiece for your Easter table. Here’s how to make one of your very own. It’s a fun, sticky, and totally ridiculous way to spend an afternoon. Make them with your kids. Just be careful with the toothpicks.
Resource:
http://www.thehungrymouse.com/2011/04/11/peep-topiary-plus-other-easter-table-top-decorating-ideas/
It’s a little known fact that Peeps grow on jelly bean trees. Topiaries, to be exact. It’s true. It must be. I have one in my kitchen right now. See? I can’t make these things up.
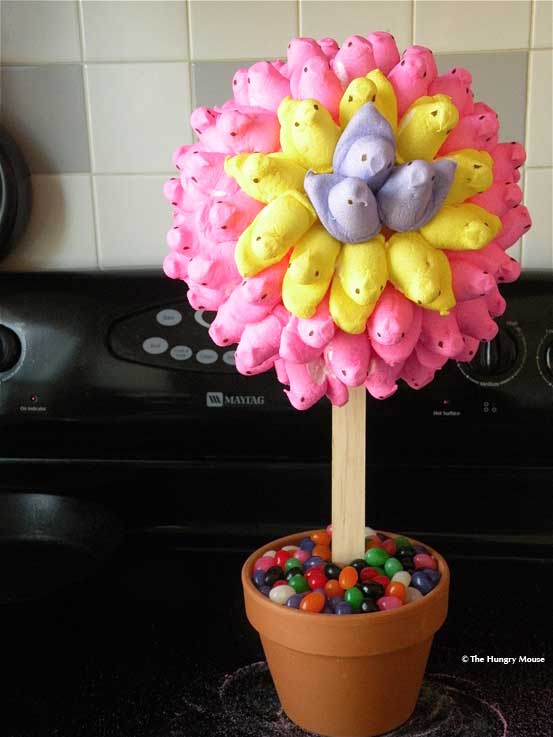
Thankfully, a Peep topiary makes a fabulous (and delicious) centerpiece for your Easter table. Here’s how to make one of your very own. It’s a fun, sticky, and totally ridiculous way to spend an afternoon. Make them with your kids. Just be careful with the toothpicks.
Resource:
http://www.thehungrymouse.com/2011/04/11/peep-topiary-plus-other-easter-table-top-decorating-ideas/
Wednesday, April 4, 2012
Chili and Cornbread in a Jar - A Jarringly Good Time!
New movement toward farm-and
family-style tables and a fun picnic.” This Chili and Cornbread in a Jar
guarantees that your picnic will be one that guests talking about for
weeks after the event is over.

Courtesy of Blue Plate Catering, Chicago
• 1 case of 16 oz. Mason Jars
• Electric Mixer or Stand Mixer (or a good ole whisk to work those muscles)
• Measuring Spoons and Cups
• Baking Sheet
Chili
2 Tbsp vegetable oil
2 each medium yellow onions, chopped
3 each garlic cloves, minced
1 lb beef chuck, cubed
3/4 lb beef sirloin, cubed
1 (14.5 oz.) can tomatoes, peeled, diced, with juice
1 (12 oz.) can dark beer
1 (6 oz.) can tomato paste
1 (14 oz.) can beef broth
1/2 cup (packed) brown sugar
3 1/2 Tbsp chili powder
1 Tbsp cumin, ground
1 tsp dried oregano
1 tsp coriander, ground
1 tsp salt
4 (15 oz.) cans kidney beans
4 each fresh poblano peppers, peeled, seeded, chopped
1. Heat oil in a large saucepan over medium heat.
2. Cook onions, garlic and beef in oil for 10 minutes, or until the meat is browned and the onions are tender.
3. Mix in the diced tomatoes with juice, dark beer, tomato paste and beef broth.
4. Season with brown sugar, chili powder, cumin, oregano, coriander and salt. Stir in the beans and poblano peppers.
5. Reduce heat to low, and simmer for 2 hours.
12 each fresh whole eggs
1 cup whole milk
2 cups powdered sugar
2 1/2 cups cake flour
1 cup cornmeal
1 tsp salt
1 1/2 Tbsp baking powder
1 cup corn kernels (fresh, canned or frozen)
1 fresh jalapeño, minced
1 Tbsp cheddar cheese, shredded
1. In a small pot, melt the butter, simmer and whisk continuously until brown bits start to form, set aside.
2. In a small mixing bowl, whip the eggs and milk.
3. Combine the powdered sugar, cake flour, salt and baking powder and sift together.
4. Whisk in the brown butter until incorporated.
5. Fold in the jalapeño and cheddar cheese.
Assembly
In each 16 oz. Mason jar:
1 1/2 cup cooked chili
1/3 cup cornbread batter
Garnish
cheddar cheese, shredded
green onions, chopped
sour cream
1. Line a baking sheet with twelve 16-oz. Mason jars.
2. Scoop 1-1/2 cup of chili in each one, followed by 1/3 cup of cornbread batter.
3. Bake at 325 F for approximately 20-25 minutes until toothpick comes out clean from the center of the cornbread.
4. Remove from oven and immediately garnish with cheddar cheese, green onions and sour cream. Serve warm.
©Catersource. A UBM Company
Chili and Cornbread in a Jar
Yield: Twelve 16-oz. Mason JarsCourtesy of Blue Plate Catering, Chicago
• 1 case of 16 oz. Mason Jars
• Electric Mixer or Stand Mixer (or a good ole whisk to work those muscles)
• Measuring Spoons and Cups
• Baking Sheet
Chili
2 Tbsp vegetable oil
2 each medium yellow onions, chopped
3 each garlic cloves, minced
1 lb beef chuck, cubed
3/4 lb beef sirloin, cubed
1 (14.5 oz.) can tomatoes, peeled, diced, with juice
1 (12 oz.) can dark beer
1 (6 oz.) can tomato paste
1 (14 oz.) can beef broth
1/2 cup (packed) brown sugar
3 1/2 Tbsp chili powder
1 Tbsp cumin, ground
1 tsp dried oregano
1 tsp coriander, ground
1 tsp salt
4 (15 oz.) cans kidney beans
4 each fresh poblano peppers, peeled, seeded, chopped
1. Heat oil in a large saucepan over medium heat.
2. Cook onions, garlic and beef in oil for 10 minutes, or until the meat is browned and the onions are tender.
3. Mix in the diced tomatoes with juice, dark beer, tomato paste and beef broth.
4. Season with brown sugar, chili powder, cumin, oregano, coriander and salt. Stir in the beans and poblano peppers.
5. Reduce heat to low, and simmer for 2 hours.
Cheddar-Jalapeño Cornbread
3 sticks butter, browned12 each fresh whole eggs
1 cup whole milk
2 cups powdered sugar
2 1/2 cups cake flour
1 cup cornmeal
1 tsp salt
1 1/2 Tbsp baking powder
1 cup corn kernels (fresh, canned or frozen)
1 fresh jalapeño, minced
1 Tbsp cheddar cheese, shredded
1. In a small pot, melt the butter, simmer and whisk continuously until brown bits start to form, set aside.
2. In a small mixing bowl, whip the eggs and milk.
3. Combine the powdered sugar, cake flour, salt and baking powder and sift together.
4. Whisk in the brown butter until incorporated.
5. Fold in the jalapeño and cheddar cheese.
Assembly
In each 16 oz. Mason jar:
1 1/2 cup cooked chili
1/3 cup cornbread batter
Garnish
cheddar cheese, shredded
green onions, chopped
sour cream
1. Line a baking sheet with twelve 16-oz. Mason jars.
2. Scoop 1-1/2 cup of chili in each one, followed by 1/3 cup of cornbread batter.
3. Bake at 325 F for approximately 20-25 minutes until toothpick comes out clean from the center of the cornbread.
4. Remove from oven and immediately garnish with cheddar cheese, green onions and sour cream. Serve warm.
©Catersource. A UBM Company
Subscribe to:
Posts (Atom)